re:BIRTH
Re:BIRTH
[[
|
Song Info
| re:||BIRTH | Theme of Beyond | ||
|---|---|---|---|
| Difficulty | |||
| Easy | Normal | Hard | Overload |
| 6.0 | 9.0 | 11.5 | 13.0 |
| Artist | Camellia ft. Mayumi Morinaga | BPM: | 160 |
| Rate: | Lethal | Verses: | 1 (shown as Verse 3 in-game) |
| Boss: | Alpha (appears like Arietta) | Length: | 4:06 |
| Charter(s) | ??? | ||
Base Pattern by k//eternal
Character by fruitsrabbit
Story Context
After battling Alpha on their own and failing to defeat them, the main character imprints Beyond and borrows her power to finally triumph.
Gimmicks
Strategies
The exploding bullets in this chart are aimed. As long as you move slowly to the left, you won't get hit by them, and only need to take the gap in the flower kunai pattern. The grid of bullets that spawn are difficult to deal with, so if you get stuck there just hug the wall and try to line yourself up only on the vertical axis - on the wall, you won't be hit by any bullet columns.
For the first dark bullet section, moving from either side of the screen to have the dark bullets leave the screen as fast as possible is essential to being able to see the other bullets. These are aimed at you, but with a slight offset, so be warned.
For the first chorus, be careful about absorbing the bloid bullets - if you absorb 4 or more, the next shot you fire will convert the other bloids to blue bullets, and if they're moving down while you do that, they won't stop, most likely hitting you in the process.
For the flowers in the next section, it theoretically is possible to convert the kunais on Hard and Overload, but on Overload it's much too risky to even try. You're much, much safer just taking the gap and shielding.
The next dark section uses the same strategy as the first. Feel free to play it safe and just shield if you're just trying to clear.
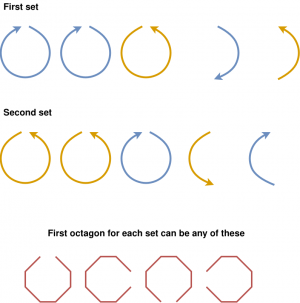
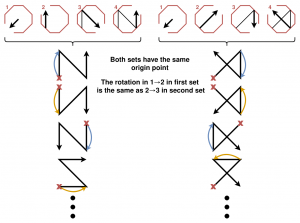
The first octagon section in rB actually follows a clear, identifiable pattern on Hard and Overload (They also follow a pattern on Easy and Normal but those ones are kinda readable). This is shown in the diagram.
For the rewind, just play it safe and if you're on Overload, maybe try to absorb 4 blues early on and don't input a shot or shield until you have to use a charged shot to convert some voids to bloids in order to survive.
For the chorus, a good strategy in the Hard and Overload charts is to absorb 4 bloid bullets, move to the large void bullets on the sides and shoot them with a charged shot to convert them to normal blue bullets. This stops them from shooting out kunais and significantly simplifies this section.

The chorus immediately transitions to the final octagon section, where the key is to move around in a circle, the speed going up with each difficulty and the Overload chart even swapping directions.
For the void gates... Good luck!!
The final attack is identical to the first attack. Make sure to input on the final beat or else you won't clear the song! Good luck again, and happy clearing!
Chart Comparison
Flavor Text
This song's navigator is locked to Beyond.
Beyond: Using Ari's power, she's going to use some weird tricks... Stay sharp and trust your instincts. Let's finish this and save Ari.
Lyrics
This song contains several lyrics in Japanese. Romaji transcriptions are written in italics next to the relevant lyrics. An English translation is listed beside the relevant text and was provided by Tenor.
Arietta's lines in this song are bolded.
|
If the countless shadows made you blind |
|
|
線 結ぼう 願いへ sen musubou negai he |
Let's tie a thread to my wish |
|
生まれる世界へ umareru sekai he |
To a newborn world |
|
If the countless shadows made you blind | |
|
We run exceeding our past | |
|
"If the countless shadows made you blind | |
|
定めを切り裂き sadame wo kirisaki |
Tear up fate |
|
(I return to the day it began)
(With a small hope to reverse my fate)
|
Official Sound
